Filling out a bank challan is an essential skill for managing various financial transactions in India. Whether you’re paying taxes, university fees, or utility bills, understanding how to correctly fill out a bank challan can save you time and avoid errors that could lead to delays or penalties. This blog post will walk you through the process of filling out a bank challan step by step.
What is a Bank Challan?
A bank challan is a standardized form used in India to make payments to the government, educational institutions, or other organizations. It serves as a receipt for the transaction and ensures that the payment is properly recorded.
Types of Bank Challans

Before we dive into the filling process, it’s important to know that there are various types of bank challans, each serving different purposes:
- Tax Payment Challans: Used for paying income tax, service tax, excise duty, etc.
- Fee Payment Challans: Used for paying school or university fees.
- Utility Payment Challans: Used for paying electricity bills, water bills, etc.
- Customs Duty Challans: Used for paying customs duties.
Components of a Bank Challan
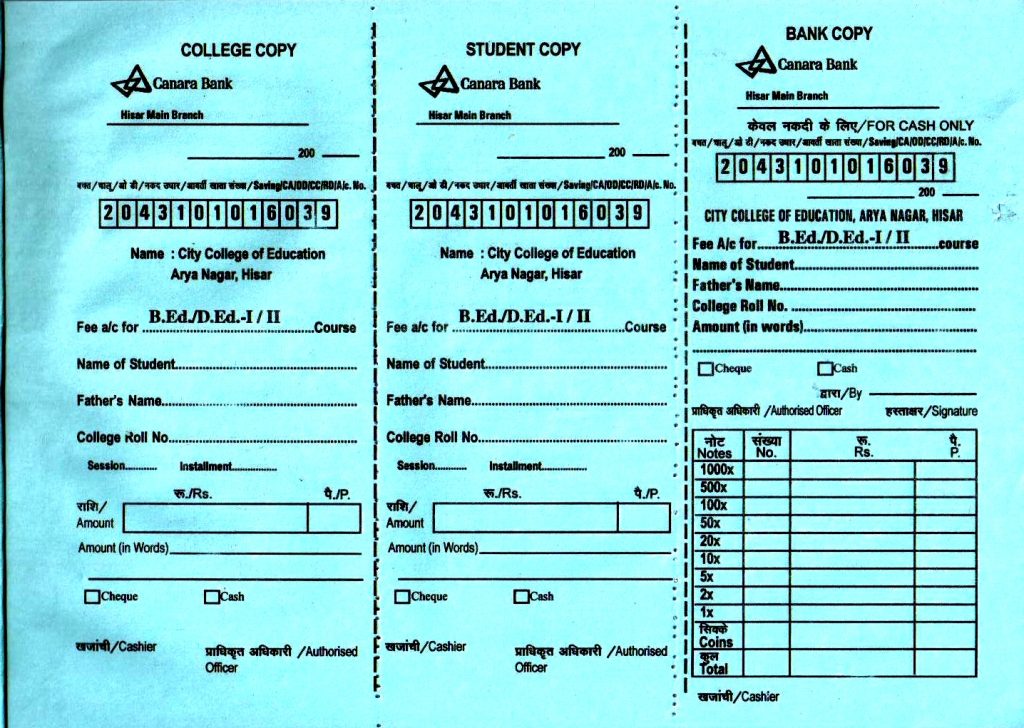
A typical bank challan consists of three parts:
- Bank’s Copy: Retained by the bank as a record of the transaction.
- Depositor’s Copy: Given to the individual or entity making the payment.
- Department’s Copy: Sent to the respective department or organization for which the payment is being made.
Step-by-Step Guide to Filling a Bank Challan
Step 1: Obtain the Challan Form
You can obtain the challan form from the relevant bank’s website or directly from the bank’s branch. For example, for income tax payments, you can download challan forms from the Income Tax Department’s website.
Step 2: Fill in the Basic Information
- Date: Enter the date on which you are making the payment.
- Branch: Write the name of the bank branch where you are submitting the challan.
Step 3: Provide Personal Details
- Name: Enter your full name or the name of the entity making the payment.
- Address: Provide a complete and accurate address.
- Contact Information: Include a phone number or email address for any necessary communication.
Step 4: Specify the Payment Details
- Type of Payment: Clearly mention the purpose of the payment (e.g., Income Tax, GST, university fee).
- Amount: Write the amount you are paying in both words and numbers to avoid any discrepancies.
- Account Number/Code: Depending on the type of payment, you may need to enter an account number or code (e.g., PAN for income tax payments).
Step 5: Fill in the Specific Fields
Each type of challan may have specific fields that need to be filled in. For instance:
- Tax Payment Challan: Enter details like Assessment Year, Major Head Code, Minor Head Code, and TAN (if applicable).
- Fee Payment Challan: Include details such as the student’s name, roll number, and course details.
Step 6: Verification
- Signature: Sign the challan to authenticate the information provided.
- Stamp: If you are submitting the challan through an organization or institution, ensure it is stamped by the authorized person.
Step 7: Submit the Challan
Take the filled challan to the bank along with the payment. The bank official will verify the details, process the payment, and provide you with the bank’s copy and the depositor’s copy for your records.
Tips to Avoid Common Mistakes
- Double-check Information: Ensure all details are correctly filled out to avoid rejection.
- Legible Writing: Write clearly and legibly to ensure there are no misunderstandings.
- Correct Codes: Use the correct codes and account numbers relevant to the payment.
- Keep Copies: Always keep a copy of the filled challan and the receipt provided by the bank.
Conclusion
Filling out a bank challan correctly is crucial for ensuring that your payments are processed smoothly. By following this step-by-step guide, you can avoid common mistakes and ensure that your transactions are recorded accurately. Whether you’re paying taxes, fees, or utility bills, mastering the challan filling process can make your financial dealings more efficient and hassle-free.


Leave a Reply